
▼ Why ?
이번에 처음으로 웹 개발 프로젝트를 진행하게 되면서, 이번 프로젝트에서 백엔드는 개발 프레임워크(Framework)로 스프링(Spring)을 다루기로 결정했기 때문에 스프링 공부를 시작하게 되었다 . 먼저, Spring이 무엇인지 이해하는 것이 우선적이라고 생각해서, 김영한 강사님의 스프링 입문 강의를 수강하여 스프링 웹 개발 애플리케이션 개발의 전반을 빠르게 훑어보는 것을 목표로 학습하고 정리해보려고 한다.
▼ 프로젝트 환경설정
템플릿 엔진 - typeleafs
- thymeleaf 공식 사이트: https://www.thymeleaf.org/
Thymeleaf
Integrations galore Eclipse, IntelliJ IDEA, Spring, Play, even the up-and-coming Model-View-Controller API for Java EE 8. Write Thymeleaf in your favourite tools, using your favourite web-development framework. Check out our Ecosystem to see more integrati
www.thymeleaf.org
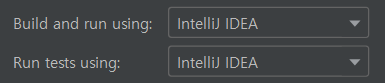
Grandle JDK 설정
- Settings(windows) [Ctrl + Alt + S] / Preferences(Mac)
Gradle은 무슨 역할?
➜ 의존관계가 있는 라이브러리들을 다 가져온다
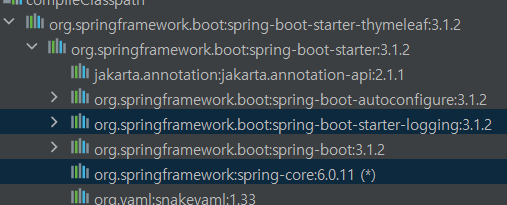
➜ Spring Boot 관련 라이브러리를 쓰면, ' Spring Core ' 같은 것들까지 다 가져오며
Spring과 관련된 세팅을 완료하고 작동
String Boot 라이브러리
- spring-boot-starter-web
- spring-boot-starter-tomcat: 톰캣 (웹서버), spring-webmvc: 스프링 웹 MVC, etc.
➜ 소스 라이브러리에서 웹서버를 내장(embedded)하고 있다
- java 메인 메서드를 실행시키면 웹서버(Hello)가 열린다 !

logging ?
- 현업에선 ' System.out.println() ' 을 사용하여 출력하지 않는다
➜ ' log ' 를 이용하여 출력해야 한다 (로그파일과 에러를 수월하게 관리하기 위해)
test 라이브러리
- ' junit (test framework) ' 이 기본으로 쓰인다
▼ View 환경설정
Spring Boot 메뉴얼에서 필요한 기능을 찾을 수 있어야 한다 !
➜ Spring 을 편리하게 사용할 수 있도록 도와주는 기능들이 너무나도 많기 때문이다
- Welcome Page 를 만들고 싶다?
- Spring Boot 에서 제공하는 Welcome Page 기능 이용
- resources/static/index.html 생성
<!DOCTYPE HTML>
<html>
<head>
    <title>Hello</title>
    <meta http-equiv="Content-Type" content="text/html; charset=UTF-8" />
</head>
<body>
Hello
<a href="/hello">hello</a>
</body>
</html>➜ 웹서버에 파일만 올리는 정적인(static) 페이지이다
- 추가 참고 사이트
➜ Spring 공식 튜토리얼: https://spring.io/guides/gs/serving-web-content/
@Controller
➜ 정적인 페이지가 아닌 동작하는 페이지를 만들어보자
1. HelloController.java
@Controller
public class HelloController {
 @GetMapping("hello")
 public String hello(Model model) {
 model.addAttribute("data", "hello!!");
 return "hello";
 }
}2. resources/templates/hello.html 생성
<!DOCTYPE HTML>
<html xmlns:th="http://www.thymeleaf.org">
<head>
<title>Hello</title>
<meta http-equiv="Content-Type" content="text/html; charset=UTF-8" />
</head>
<body>
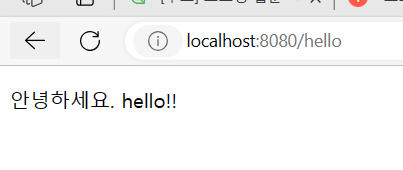
<p th:text="'안녕하세요. ' + ${data}" >안녕하세요. 손님</p>
</body>
</html>⭣ ⭣ " typeleafs 템플릿 엔진 동작 "
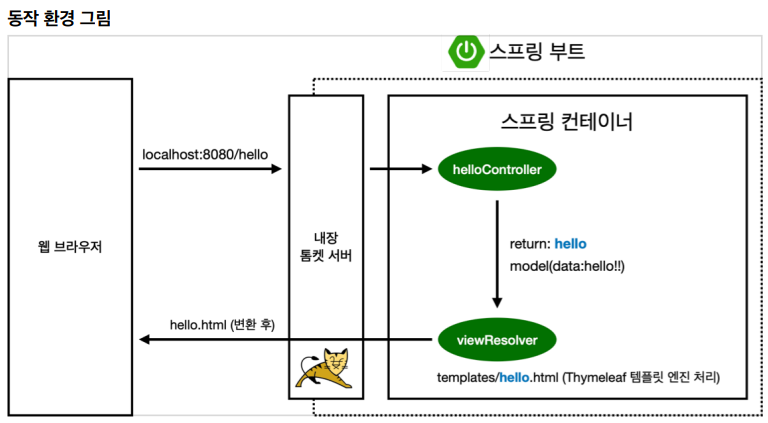
Spring Boot 의 동작 환경
- ' tomcat ' 이라는 웹서버를 내장하고 있다
- ' @GetMapping("hello") ' ➜ " localhost:8080/hello " URL에 매칭
- Spring Container 가 ' model ' 에 data 를 넣어준다
- Spring의 ' viewResolver ' 가 Controller가 반환한 값(' viewName ')을 Spring Boot 의 템플릿 엔진에서 매핑한다
( ' resources:template\ ' + {ViewName} + ' .html ' 을 매핑 ) - 해당 html(' hello.html ') 이 웹서버에서 열리게 된다.
- spring-boot-devtools 라이브러리를 추가하면,
html 파일을 컴파일만 해주면 서버 재시작 없이 View 파일 변경이 가능하다
▼ Why ?
이번에 처음으로 웹 개발 프로젝트를 진행하게 되면서, 이번 프로젝트에서 백엔드는 개발 프레임워크(Framework)로 스프링(Spring)을 다루기로 결정했기 때문에 스프링 공부를 시작하게 되었다 . 먼저, Spring이 무엇인지 이해하는 것이 우선적이라고 생각해서, 김영한 강사님의 스프링 입문 강의를 수강하여 스프링 웹 개발 애플리케이션 개발의 전반을 빠르게 훑어보는 것을 목표로 학습하고 정리해보려고 한다.
▼ 프로젝트 환경설정
템플릿 엔진 - typeleafs
- thymeleaf 공식 사이트: https://www.thymeleaf.org/
Thymeleaf
Integrations galore Eclipse, IntelliJ IDEA, Spring, Play, even the up-and-coming Model-View-Controller API for Java EE 8. Write Thymeleaf in your favourite tools, using your favourite web-development framework. Check out our Ecosystem to see more integrati
www.thymeleaf.org
Grandle JDK 설정
- Settings(windows) [Ctrl + Alt + S] / Preferences(Mac)
Gradle은 무슨 역할?
➜ 의존관계가 있는 라이브러리들을 다 가져온다
➜ Spring Boot 관련 라이브러리를 쓰면, ' Spring Core ' 같은 것들까지 다 가져오며
Spring과 관련된 세팅을 완료하고 작동
String Boot 라이브러리
- spring-boot-starter-web
- spring-boot-starter-tomcat: 톰캣 (웹서버), spring-webmvc: 스프링 웹 MVC, etc.
➜ 소스 라이브러리에서 웹서버를 내장(embedded)하고 있다
- java 메인 메서드를 실행시키면 웹서버(Hello)가 열린다 !
logging ?
- 현업에선 ' System.out.println() ' 을 사용하여 출력하지 않는다
➜ ' log ' 를 이용하여 출력해야 한다 (로그파일과 에러를 수월하게 관리하기 위해)
test 라이브러리
- ' junit (test framework) ' 이 기본으로 쓰인다
▼ View 환경설정
Spring Boot 메뉴얼에서 필요한 기능을 찾을 수 있어야 한다 !
➜ Spring 을 편리하게 사용할 수 있도록 도와주는 기능들이 너무나도 많기 때문이다
- Welcome Page 를 만들고 싶다?
- Spring Boot 에서 제공하는 Welcome Page 기능 이용
- resources/static/index.html 생성
<!DOCTYPE HTML>
<html>
<head>
    <title>Hello</title>
    <meta http-equiv="Content-Type" content="text/html; charset=UTF-8" />
</head>
<body>
Hello
<a href="/hello">hello</a>
</body>
</html>
➜ 웹서버에 파일만 올리는 정적인(static) 페이지이다
- 추가 참고 사이트
➜ Spring 공식 튜토리얼: https://spring.io/guides/gs/serving-web-content/
@Controller
➜ 정적인 페이지가 아닌 동작하는 페이지를 만들어보자
1. HelloController.java
@Controller
public class HelloController {
 @GetMapping("hello")
 public String hello(Model model) {
 model.addAttribute("data", "hello!!");
 return "hello";
 }
}
2. resources/templates/hello.html 생성
<!DOCTYPE HTML>
<html xmlns:th="http://www.thymeleaf.org">
<head>
    <title>Hello</title>
    <meta http-equiv="Content-Type" content="text/html; charset=UTF-8" />
</head>
<body>
<p th:text="'안녕하세요. ' + ${data}" >안녕하세요. 손님</p>
</body>
</html>
⭣ ⭣ " typeleafs 템플릿 엔진 동작 "
Spring Boot 의 동작 환경
- ' tomcat ' 이라는 웹서버를 내장하고 있다
- ' @GetMapping("hello") ' ➜ " localhost:8080/hello " URL에 매칭
- Spring Container 가 ' model ' 에 data 를 넣어준다
- Spring의 ' viewResolver ' 가 Controller가 반환한 값(' viewName ')을 Spring Boot 의 템플릿 엔진에서 매핑한다
( ' resources:template\ ' + {ViewName} + ' .html ' 을 매핑 ) - 해당 html(' hello.html ') 이 웹서버에서 열리게 된다.
- spring-boot-devtools 라이브러리를 추가하면,
html 파일을 컴파일만 해주면 서버 재시작 없이 View 파일 변경이 가능하다